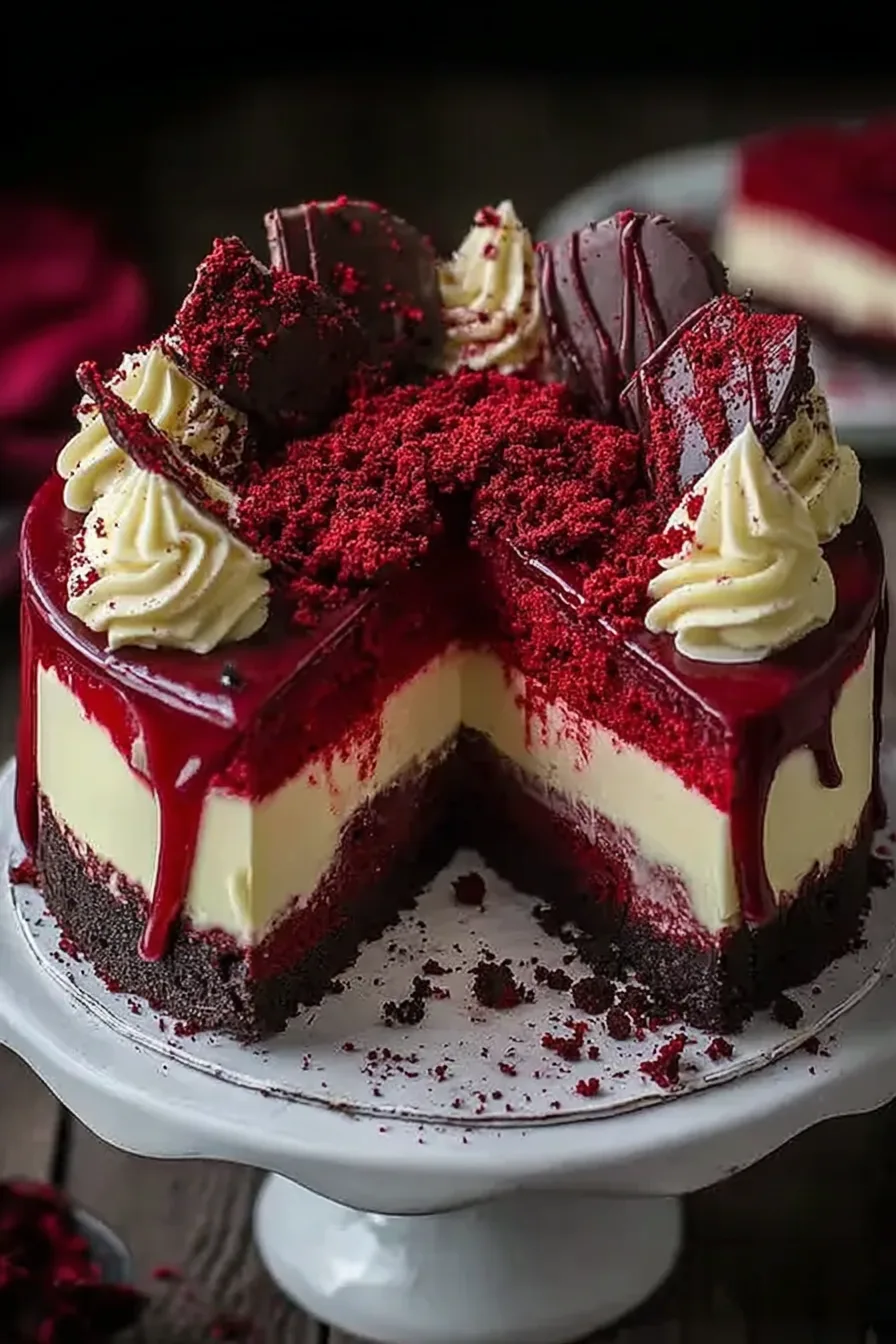
This stunning dessert brings together the best of two beloved treats: rich red velvet cake and creamy, dreamy cheesecake. Our red velvet cheesecake recipe, inspired by famous bakery creations, offers a truly decadent experience. It’s the perfect show-stopping dessert for holidays, celebrations, or any time you crave something truly special and impressive.
Table of Contents
Why You’ll Love This Red Velvet Cheesecake
You’ll adore this recipe for its irresistible qualities, making it a favorite for both bakers and dessert lovers alike. It’s designed to be a memorable and enjoyable baking experience.
- Irresistible Flavor Combination: Enjoy the perfect marriage of tangy cream cheese and moist cocoa notes.
- Moist Red Velvet Cake: Each cake layer is tender, soft, and beautifully red.
- Creamy, Smooth Cheesecake: The baked cheesecake layer adds a luxurious, velvety texture.
- Velvety Cream Cheese Frosting: A classic, tangy frosting perfectly complements both cake and cheesecake.
- Impressive Showstopper Dessert: This towering red velvet cheesecake will surely wow your guests.
- Great for Making Ahead: Prepare components in advance for stress-free assembly on serving day.
Ingredients
Gather these quality ingredients to create your spectacular red velvet cheesecake.
According to baking experts, using room temperature ingredients is key for the best texture and smooth mixing in both the cake and cheesecake batters.
For the Cheesecake Layer
- 16 ounces cream cheese, at room temperature
- ½ cup (99 g) granulated sugar
- 1 tablespoon all-purpose flour
- Pinch salt
- ¼ cup (60 ml) heavy cream
- ½ teaspoon vanilla extract
- 2 eggs, at room temperature
For the Red Velvet Cake
- ½ cup (113 g) unsalted butter, at room temperature
- 1½ cups (298 g) granulated sugar
- 2 eggs
- ¼ cup (26 g) + 1 tablespoon unsweetened cocoa powder
- 6 tablespoons red food coloring, liquid
- 1 teaspoon vanilla extract
- 1 cup (240 ml) buttermilk
- 2¼ cups (270 g) all-purpose flour
- 1 teaspoon baking soda
- 1 teaspoon salt
- 1 tablespoon distilled white vinegar
For the Cream Cheese Frosting
- 1 cup (227 g) unsalted butter, at room temperature
- 4 cups (454 g) powdered sugar
- 2 teaspoons vanilla extract
- Pinch salt
- 16 ounces cream cheese, chilled and cut into 16 pieces
Notes & Substitutions
Use full-fat cream cheese for both the cheesecake and frosting; it ensures a rich, stable result. For optimal leavening, understanding the difference between natural and Dutch-processed cocoa powder is crucial, as natural cocoa powder is recommended for this recipe. If you don’t have buttermilk, combine 1 cup milk with 1 tablespoon lemon juice or white vinegar and let it sit for 5 minutes. For coloring, gel food coloring offers a more vibrant red with less liquid, so adjust quantity if substituting liquid. Distilled white vinegar reacts with baking soda to create lift and tender crumb. Always ensure room temperature ingredients for smooth, lump-free batters and emulsified mixtures.
Equipment
Having the right tools makes baking this dessert much easier and more enjoyable.
- 9-inch springform pan
- Two 9-inch round cake pans
- Electric mixer (stand or hand)
- Mixing bowls
- Parchment paper rounds
- Wire cooling racks
- Rubber spatula
- Sharp knife
Instructions
Creating this layered red velvet cheesecake involves several steps, but each one is straightforward and rewarding. Follow these instructions carefully for a beautiful and delicious outcome.
Make the Cheesecake Layer
First, preheat your oven to 350 degrees F. Lightly spray a 9-inch springform pan with non-stick cooking spray, then line the bottom with a parchment paper round. In a large bowl, use an electric mixer on medium-low speed to beat the cream cheese, sugar, flour, and salt. Mix until the mixture is creamy and smooth, about 3 minutes, ensuring no cream cheese lumps remain. Scrape down the bowl sides, then add the heavy cream and vanilla, mixing until just combined. Beat in the eggs one at a time, mixing for about 15 seconds after each addition. Finish by mixing a few times by hand with a rubber spatula to ensure all ingredients are evenly incorporated.
Pour the filling into the prepared springform pan, spreading it into an even layer. Bake the cheesecake for 40 to 55 minutes, or until it is set and does not jiggle in the center. Remove the cheesecake from the oven and cool it on a wire rack for at least 1 hour. Once the cheesecake reaches room temperature, transfer it to the freezer for a minimum of 3 hours or preferably overnight. This firming step is crucial for successful assembly of your red velvet cheesecake.
Make the Red Velvet Cake Layers
Begin by preheating your oven to 350 degrees F. Grease two 9-inch cake pans, then line the bottoms with parchment paper rounds. Butter the parchment paper and then flour the pans, tapping out any excess. In a large bowl, cream the butter and sugar on medium-high speed until light and fluffy, about 3 minutes. Turn the mixer to high and add the eggs one at a time, beating for about a minute after each addition. Scrape down the bowl and beat until everything is well incorporated.
In a separate small bowl, combine the cocoa powder, vanilla extract, and red food coloring to form a thick paste. Add this vibrant paste to the butter mixture and mix on medium speed until the color is completely combined throughout the batter. You might need to pause and scrape the bottom of the bowl to ensure all the batter is uniformly colored. Reduce the mixer speed to low and slowly add half of the buttermilk, mixing until just combined. Then add half of the flour and mix until incorporated. Scrape the bowl, then repeat with the remaining buttermilk and flour. Increase the speed to high and beat until the batter is smooth. Finally, with the mixer speed on low, add the salt, baking soda, and vinegar. Turn the mixer to high again and beat for another couple of minutes until the mixture is completely combined and smooth.
Divide the cake batter evenly between the two prepared cake pans. Bake for about 30 minutes, or until a thin knife or skewer inserted into the center comes out clean. Let the cakes cool in their pans for 10 minutes before carefully removing them and placing them on a wire cooling rack to cool completely.
Prepare the Cream Cheese Frosting
Using an electric mixer, beat the butter, powdered sugar, vanilla, and salt on low speed until smooth. Continue mixing for an additional 2 minutes, scraping down the bowl as needed to ensure everything is fully combined. Increase the mixer speed to medium-low and gradually add the chilled cream cheese one piece at a time, beating until smooth. Mix for another 2 minutes until the frosting is light, fluffy, and completely smooth.
Assemble the Red Velvet Cheesecake
First, level the tops of your cooled red velvet cake layers if necessary, creating flat surfaces for stacking. Place one cake layer onto your chosen serving platter. Remove the cheesecake from the freezer and carefully detach the sides of the springform pan. Gently slide a sharp knife between the bottom of the cheesecake and the parchment paper to release it from the pan bottom and parchment round. If the cheesecake is wider than the cake layers, use a sharp knife to carefully shave off a small amount from the sides of the cheesecake so it perfectly matches the width of your cake layers.
Carefully place the prepared cheesecake layer on top of the first red velvet cake layer. Then, position the second red velvet cake layer on top of the cheesecake layer, placing it upside-down for a flatter top surface. Spread a very thin layer of the cream cheese frosting, known as a “crumb coat,” over the top and sides of the entire cake. Refrigerate the cake for 30 minutes to allow this crumb coat to set, trapping any loose crumbs. After chilling, apply a final, liberal coat of cream cheese frosting over the top and sides of the assembled red velvet cheesecake.
Decorate and Serve
For a beautiful finish, consider garnishing your finished red velvet cheesecake. You can finely crumble some leftover red velvet cake for a classic decoration around the base or top edge. Piping extra frosting in decorative swirls or adding elegant chocolate shavings also works wonderfully. Sprinkles can add a fun, festive touch, especially for celebrations. Advise chilling the entire cake for at least an hour before serving to ensure the frosting is firm and the layers are stable. Serve slices with a dollop of fresh whipped cream, if desired, for an extra touch of indulgence.
Pro Tips & Troubleshooting
Achieving a perfect red velvet cheesecake is simple with a few helpful pointers.
- Ensure all ingredients are room temperature for smooth, lump-free batters and frostings that emulsify properly.
- Do not overmix cheesecake batter after adding eggs, as this can incorporate too much air and lead to cracks.
- Prevent cheesecake cracks with slow cooling; let it cool gradually in the oven with the door ajar, then at room temperature.
- Use vibrant gel food coloring for a deep, rich red velvet color that truly stands out.
- Properly measure flour by spooning it into the measuring cup and leveling, which prevents a dense cake texture.
- Use a water bath for cheesecake (optional); it provides gentle, even heat, further reducing the risk of cracks and ensuring a creamy texture.
- Level cakes for even layers using a serrated knife or a cake leveler for a professional presentation.
Serving, Storage & Variations
This impressive dessert is versatile for any occasion and stores well.
Serving Suggestions
Serve this stunning red velvet cheesecake chilled but allow it to sit at room temperature for about 20 minutes before slicing for the best texture. You can offer it simply or with fresh berries, like raspberries or strawberries, to complement the richness. A drizzle of chocolate sauce or a sprinkle of mini chocolate chips also makes a delightful addition.
Make-Ahead Instructions
- Cheesecake: Freeze the baked cheesecake layer, tightly wrapped, for up to 3 months.
- Cake layers: Wrap cooled cake layers well and refrigerate for up to 3 days or freeze for up to 2 months.
- Frosting: Prepare the frosting and refrigerate in an airtight container for up to 2 days; re-whip briefly before using.
Storage Instructions
Store the assembled red velvet cheesecake in an airtight container in the refrigerator for up to 5 days. Keeping it covered prevents it from drying out and absorbing other fridge odors.
Freezing Instructions
You can freeze individual components as mentioned above, or freeze the entire assembled cake. For the whole cake, place it uncovered in the freezer until firm, then wrap tightly in plastic wrap and then foil. It will keep for up to 1 month. Thaw the frozen cake overnight in the refrigerator before serving.
Variations
- Mini red velvet cheesecakes: Use cupcake pans and smaller springform molds for individual portions.
- Different red velvet cake recipes: Experiment with different spice levels or cocoa amounts in the cake batter.
- Add chocolate chips to cheesecake: Fold mini chocolate chips into the cheesecake batter for an extra textural element.
- Decorate with different toppings: Try candied pecans, white chocolate curls, or a dusting of cocoa powder.
Nutrition Information
This red velvet cheesecake offers a rich and indulgent experience. Here’s a general breakdown per serving.
| Nutrient | Amount |
|---|---|
| Calories | 669 kcal |
| Carbohydrates | 73 g |
| Protein | 8 g |
| Fat | 40 g |
| Saturated Fat | 23 g |
| Trans Fat | 1 g |
| Cholesterol | 156 mg |
| Sodium | 432 mg |
| Potassium | 164 mg |
| Fiber | 1 g |
| Sugar | 57 g |
| Vitamin A | 1432 IU |
| Vitamin C | 1 mg |
| Calcium | 92 mg |
| Iron | 1 mg |
| Serving Size | 1 serving |
Disclaimer: Nutritional information is an estimate based on ingredients and preparation methods. Actual values may vary.
Frequently Asked Questions (FAQ)
- Can I use a boxed red velvet cake mix? Yes, you certainly can. Simply follow the package directions for baking your cake layers, then proceed with the cheesecake and frosting steps.
- Why is my red velvet cake dense? Overmixing the batter, especially after adding flour, or using ingredients that are not at room temperature can lead to a dense cake.
- Do I need a water bath for this cheesecake? Using a water bath is optional but highly recommended. It helps the cheesecake bake evenly and prevents cracks.
- What’s the difference between red velvet cake and chocolate cake? Red velvet cake typically uses a smaller amount of cocoa powder and relies on acidic ingredients like buttermilk and vinegar to react with baking soda, creating its signature tender crumb and reddish hue.
- Can I omit the red food coloring? Yes, you can omit it. Without the coloring, you’ll have a delicious, tender cocoa-flavored cake that’s light brown instead of red.
- How do I prevent my cheesecake from cracking? To prevent cracks in your red velvet cheesecake, avoid overbaking and ensure it cools very gradually.
Conclusion
This red velvet cheesecake truly delivers on both stunning presentation and incredible flavor. Combining the best elements of classic red velvet and a rich, creamy cheesecake, it’s a dessert that will impress everyone at your table. We encourage you to try this recipe for your next special occasion or simply to treat yourself. Share your creations and let us know what you think in the comments below!
Best Red Velvet Cheesecake Recipe | Velvety Soft & Elegant!
Ingredients
Equipment
Method
- Preheat oven to 350°F. Prepare a 9-inch springform pan by spraying it with non-stick spray and lining the bottom with parchment paper.
- Beat cream cheese, sugar, flour, and salt until creamy using an electric mixer, then scrape the bowl, add heavy cream and vanilla, and beat to combine. Incorporate eggs one at a time, then mix by hand to ensure all ingredients are evenly blended.
- Pour filling into the prepared pan and spread evenly. Bake for 40-55 minutes until set, then cool on a wire rack for at least 1 hour at room temperature before freezing for a minimum of 3 hours or overnight.
- Preheat oven to 350°F. Grease two 9-inch cake pans, line the bottoms with buttered parchment rounds, and flour the pans.
- Cream butter and sugar on medium-high speed until light and fluffy, then add eggs one at a time on high speed, mixing thoroughly after each addition.
- In a separate small bowl, combine cocoa powder, red food coloring, and vanilla extract to form a thick paste. Add this paste to the batter and mix on medium speed until the color is completely and evenly incorporated.
- Reduce mixer speed to low and alternately add half of the buttermilk and half of the flour, mixing until just combined. Repeat with remaining buttermilk and flour, then beat on high until smooth.
- On low speed, add salt, baking soda, and vinegar, then increase to high speed and beat for a couple more minutes until completely combined and smooth.
- Divide the batter evenly between the two cake pans and bake for approximately 30 minutes, or until a thin knife inserted into the center comes out clean. Cool cakes in pans for 10 minutes before transferring them to a cooling rack to cool completely.
- Using an electric mixer, beat butter, powdered sugar, vanilla, and salt on low speed until smooth, then continue mixing for an additional 2 minutes, scraping the bowl as needed.
- Increase speed to medium-low, add chilled cream cheese pieces one at a time, mixing until smooth, and then continue mixing for another 2 minutes.
- Level the cake tops if necessary, then place one cake layer on a serving platter. Remove the frozen cheesecake from its pan and parchment, trimming its sides with a sharp knife if needed to match the cake layers.
- Carefully place the cheesecake layer on top of the first cake layer, then position the second cake layer on top of the cheesecake layer, upside-down.
- Apply a very thin layer of cream cheese frosting as a “crumb coat” over the entire cake, then refrigerate for 30 minutes to set. After chilling, apply a generous second coat of frosting and decorate as desired.
- Keep the cake refrigerated, allowing it to sit at room temperature for 20 minutes before serving. Cover and store any leftovers in the refrigerator for up to 5 days.