Introduction
Get ready to add a touch of spooky fun to your Halloween celebrations with these adorable Halloween Witches’ Broomstick Breadsticks! This recipe transforms simple store-bought dough into a festive and edible decoration that’s perfect for any ghoulish gathering. They are incredibly easy to make, even for beginner bakers, and promise to be a delightful hit with both kids and adults. Impress your guests and make some magic in the kitchen with these charming broomsticks!
Table of Contents
Why You’ll Love These Halloween Witches’ Broomstick Breadsticks
You’ll adore making these spooky treats for a multitude of reasons, making them a fantastic addition to your holiday repertoire.
- Quick and Easy Preparation: Using pre-made frozen dough drastically cuts down on prep time. You can have these fun Halloween Witches’ Broomstick Breadsticks ready in no time.
- Fun and Interactive for Kids: Little hands can help roll the dough and shape the bristles, making it a wonderful family activity. This hands-on project gets everyone excited for Halloween.
- Minimal Ingredients Needed: You only need two core ingredients, plus any optional seasonings you desire. This simplicity ensures a stress-free baking experience.
- Versatile for Dipping or Side Dishes: Serve them with marinara, cheese dip, or alongside a hearty soup or chili. They’re a delicious and visually appealing accompaniment.
- Perfect Festive Addition to Halloween: These broomsticks instantly elevate your Halloween spread with their charming, spooky theme. They bring smiles and a touch of whimsy to any party table.
Ingredients
Gathering your ingredients is straightforward for these fun Halloween Witches’ Broomstick Breadsticks. You only need a couple of items to create this festive treat.
- 9 Rhodes Yeast Dinner Rolls
- 1 Tbsp melted butter (for brushing hot rolls)
Notes & Substitutions
Feel free to get creative with your dough and seasonings. If Rhodes dinner rolls aren’t available, other frozen dough options work wonderfully. You can use frozen pizza dough, crescent roll dough, or even biscuit dough for a slightly different texture; just adjust baking times as per package instructions. For a truly homemade touch, prepare your favorite yeast dough from scratch. To enhance the flavor, sprinkle garlic powder, onion powder, dried herbs like oregano or parsley, or grated Parmesan cheese onto the dough before baking. For those avoiding dairy, simply use a plant-based butter alternative or olive oil for brushing the warm breadsticks.
Equipment
Making these themed breadsticks requires just a few basic kitchen tools. You likely have most of these items already!
- Baking sheet: A standard sheet pan provides ample space for your breadsticks.
- Parchment paper or silicone mat: This prevents sticking and makes cleanup a breeze.
- Bench scraper or knife: Essential for precisely cutting the broom bristles.
- Rolling pin (optional): Handy for consistent dough thickness, though hands work too.
- Pastry brush: Perfect for evenly coating your warm breadsticks with melted butter.
- Clean dish towel: Use this to cover the dough while it proofs.
Instructions
Creating these delightful Halloween Witches’ Broomstick Breadsticks is a fun and simple process. Follow these steps carefully to ensure perfect, spooky treats!
First, ensure your frozen Rhodes Yeast Dinner Rolls are properly thawed. Place the rolls on a lightly floured surface or a plate and let them come to room temperature. They should feel soft and slightly puffed before you begin shaping. This thawing process is crucial for easy handling.
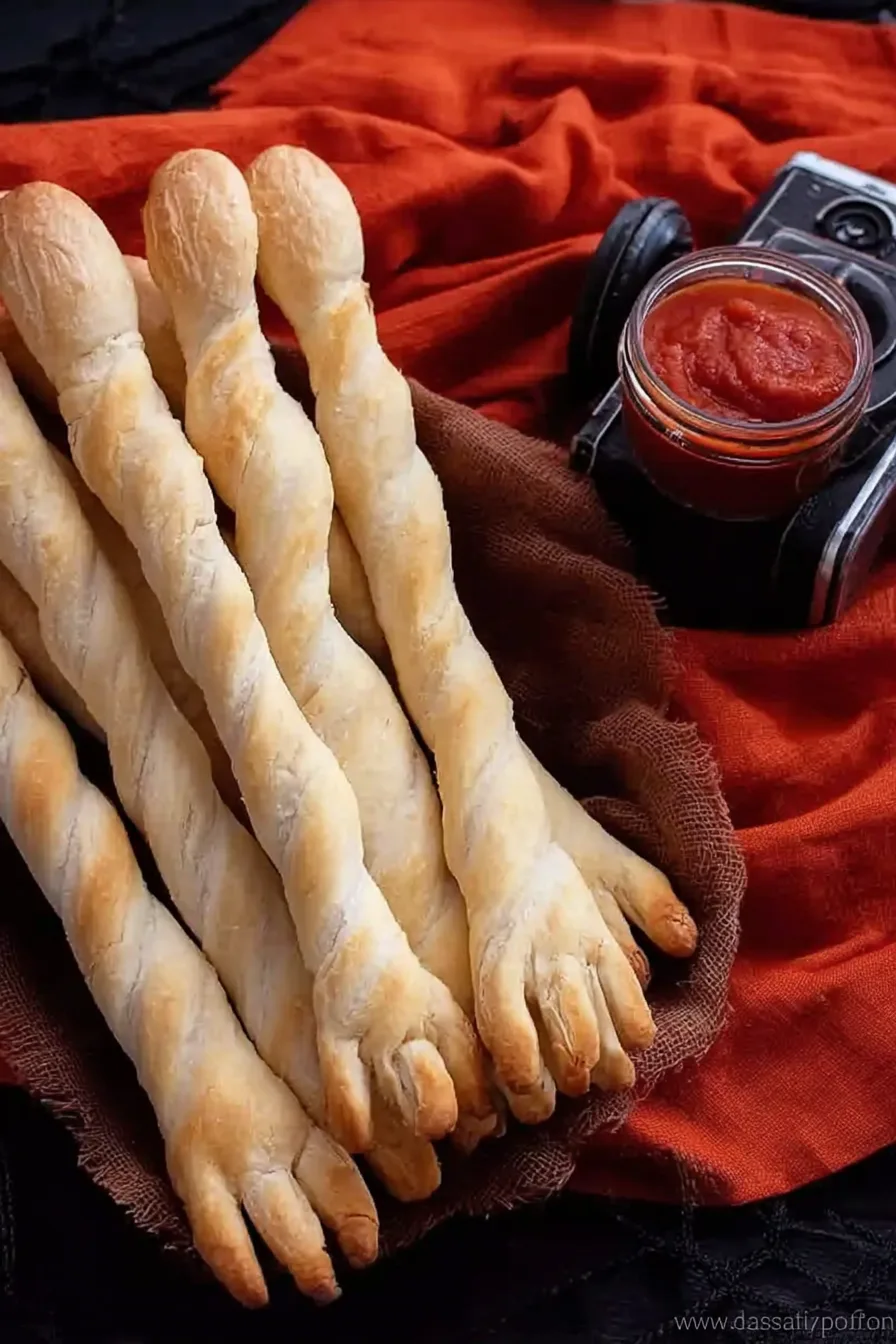
Next, take each thawed roll, one at a time. Pinch off a small piece of dough, roughly the size of a marble or a small grape. This smaller piece will be used to create the “wrap” directly above the broom’s bristles. Set these small pieces aside.
Now, with the larger remaining piece of dough from each roll, gently roll it into a long, thin rope. Aim for a length that is almost the width of your baking sheet, typically about 10-12 inches. Try to keep the thickness consistent along the rope, except for one end.
On one end of each dough rope, use a bench scraper, dough cutter, or a regular kitchen knife to gently flatten it. This flattened section will become the bristles of your broomstick. You want it somewhat wider than the rest of the rope.
With the flattened end, use your bench scraper or knife to cut thin strips, about 1/4 to 1/2 inch deep, creating the distinct broom bristles. Don’t cut all the way through; leave about an inch of the flattened dough intact at the top, connecting the bristles to the main “handle” of the broomstick.
Take the small piece of dough you pinched off earlier. Roll it into a tiny rope, then wrap it directly around the base of the bristles, where they meet the main handle. Gently press the ends together to secure the wrap, making it look like the binding of a witch’s broom.
Carefully arrange your shaped Halloween Witches’ Broomstick Breadsticks on your prepared baking sheet, lined with parchment paper or a silicone mat. Ensure you leave about 1 inch of space between each broomstick to allow for expansion during proofing and baking.
Cover the baking sheet loosely with a clean dish towel. Let the broomsticks rest in a warm place for about 15-20 minutes, or until they puff up slightly. This second proofing will result in lighter, airier breadsticks.
Remove the dish towel and bake the broomsticks in a preheated oven at 350 degrees Fahrenheit (175 degrees Celsius) for 15 to 20 minutes. Bake until they are beautifully golden brown and cooked through. Keep an eye on them to prevent overbrowning.
As soon as you remove the hot breadsticks from the oven, immediately brush them generously with the melted butter. This adds a wonderful sheen, flavor, and helps keep them soft. Serve your warm Halloween Witches’ Broomstick Breadsticks right away with your favorite spooky dips!
Pro Tips for Perfect Breadsticks
Achieving delicious and visually appealing breadsticks is easy with these helpful tips. Keep these in mind as you create your Halloween Witches’ Broomstick Breadsticks.
- Dough Handling: Avoid overworking the dough once it’s thawed. Handle it gently to maintain its airy texture and ensure a soft result. Too much kneading can make them tough.
- Even Baking: Space your breadsticks adequately on the baking sheet. Overcrowding can lead to uneven baking and prevents air circulation, resulting in less crispy edges.
- Golden Finish: Bake until they reach a light golden brown color. This indicates they are fully cooked and have a delightful slight crispness on the outside while remaining soft inside.
- Creative Bristles: Don’t be afraid to vary the length and thickness of the broom bristles. Some can be short and stubby, others longer and more dramatic, adding to their whimsical charm.
- Flavor Boost: Enhance the melted butter by stirring in a pinch of garlic powder, dried Italian herbs, or a tiny sprinkle of flaky sea salt. This simple addition elevates the overall taste.
Serving Suggestions, Storage, and Variations
These Halloween Witches’ Broomstick Breadsticks are incredibly versatile. You can serve them in many ways, store them for later, or even get creative with flavor variations!
Serving
Serve these spooky breadsticks warm for the best flavor and texture. They pair wonderfully with a variety of dips. Classic marinara or rich pizza sauce are always popular choices, offering a familiar, savory contrast. For a creamier option, try serving them with a warm spinach and artichoke dip or a gooey cheese dip. Don’t forget to include them alongside Halloween-themed soups, like a “Witches’ Brew” green soup, or a hearty soup or chili for a complete and festive meal. They’re also excellent just on their own as a fun snack.
Storage
Once cooled completely, store any leftover breadsticks in an airtight container or a resealable plastic bag at room temperature for up to 2-3 days. For longer storage, you can freeze unbaked dough by shaping the broomsticks and then freezing them solid on a baking sheet before transferring to a freezer bag. Bake from frozen, adding a few extra minutes to the baking time. Baked breadsticks can also be frozen for up to one month; simply reheat in a toaster oven or regular oven until warm.
Variations
Get creative with your broomsticks by trying these exciting variations. For a savory twist, make Garlic Parmesan Witches’ Broomstick Breadsticks by adding garlic powder and grated Parmesan cheese to the melted butter before brushing. You can also knead dried herbs like rosemary or oregano directly into the dough for herb-infused broomsticks. If you love cheese, try cheesy broomsticks by sprinkling shredded mozzarella or cheddar over the dough handles before baking. For a sweet treat, brush with melted butter mixed with cinnamon sugar after baking, transforming them into “dessert brooms” perfect for dipping in chocolate sauce or cream cheese frosting.
Nutrition Information
Understanding the nutritional content of your food is always a good practice. These estimated values for Halloween Witches’ Broomstick Breadsticks can help you plan your festive menu.
| Nutrient | Amount |
|---|---|
| Serving Size | 1 breadstick |
| Calories | 111 kcal |
| Carbohydrates | 5 g |
| Protein | 2 g |
| Fat | 2 g |
| Saturated Fat | 1 g |
| Cholesterol | 3 mg |
| Sodium | 45 mg |
| Fiber | 1 g |
| Unsaturated Fat | 1 g |
Disclaimer: These values are estimates based on standard recipes and may vary depending on specific ingredients and preparation methods. Please use them as a general guide.
Frequently Asked Questions (FAQ)
Here are some common questions about making and serving these fun Halloween Witches’ Broomstick Breadsticks.
Can I make these breadsticks ahead of time?
Yes, you can prepare the dough and shape the broomsticks a few hours in advance, then cover them and refrigerate until ready to bake. Let them come to room temperature before baking.
What other dips pair well with these?
Beyond marinara, try a creamy ranch dip, a spicy queso, or even a homemade pesto. The mild flavor of the breadsticks complements many savory options.
How do I prevent the breadsticks from getting too hard?
Avoid overbaking them; remove them from the oven as soon as they turn golden brown. Brushing them generously with melted butter immediately after baking also helps keep them soft.
Can I use homemade bread dough instead of frozen?
Absolutely! If you have a favorite bread dough recipe, feel free to use it. Just ensure it’s a soft, pliable dough that’s easy to roll and shape for the Halloween Witches’ Broomstick Breadsticks.
Are these suitable for a kids’ Halloween party?
They are absolutely perfect for a kids’ Halloween party! Their fun shape makes them instantly appealing, and they’re easy for little hands to hold and dip.
Conclusion
These Halloween Witches’ Broomstick Breadsticks offer a fantastic way to bring some easy, festive fun into your kitchen this spooky season. With minimal ingredients and straightforward steps, even beginner bakers can whip up a batch of these charming treats. They are delicious, interactive, and perfectly capture the spirit of Halloween. Don’t wait to try this delightfully spooky recipe! We can’t wait to see your wonderful creations. Happy baking, and have a frightfully good time!
Spooky & Delicious: Easy Halloween Witches’ Broomstick Breadsticks
Ingredients
Equipment
Method
- Allow Rhodes dinner rolls to thaw to room temperature and slightly rise.
- For each roll, cut off a small piece to create the broom's "wrapping" above the bristles.
- Roll the larger piece of dough into a long rope, aiming for a length nearly the width of your baking sheet.
- Flatten one end of the breadstick rope using a bench scrape, dough cutter, or knife.
- Use a bench scrape, dough cutter, or knife to cut bristles into the flattened end of the breadstick.
- Wrap the smaller dough rope directly above the bristles, giving it the appearance of a broom or mop handle.
- Arrange the shaped broomsticks about 1 inch apart on a silicon-lined or greased baking sheet.
- Cover the breadsticks with a dish towel until they puff up slightly, then bake at 350°F for 15-20 minutes until golden brown.
- Immediately after baking, brush the hot breadsticks with melted butter and serve with marinara sauce or soup.